I Engineered How AI Works for Me — Harness Engineering Setup
Too lazy to repeat myself every session. So I built a harness engineering system: init-harness auto-generates CLAUDE.md + 7 commands + hooks. /workflow runs the full pipeline from branch to commit.
On this page (11)
What Is Harness Engineering
A harness is originally the gear you put on a horse. Here it means the work framework you put on AI. It's not just writing better prompts — it's building a system that defines how Claude works.
There are three components. Rules is the CLAUDE.md at the project root — the rules Claude must always follow in this project. Commands are saved files for repeated task requests: things like /workflow and /plan-and-spec. Hooks are logic that runs automatically before or after specific actions. This is the most powerful layer of the three.
Rules define "what to do." Commands define "how to do it." Hooks enforce "what must never happen." The three layers combine into a single framework.
Background on This Structure
The Commands and Hooks concepts exist in Anthropic's official Claude Code documentation. Harness engineering is a method of combining these features to automate an entire personal development workflow. It uses official features — not hidden ones.
The Full Structure at a Glance
The file structure is the fastest way to understand it. It's split into a global area and a per-project area. The global area is shared across every project on your machine. Set it up once and it carries over to every project.
commands/
init-harness.md ← auto-build harness (this file)
new-project.md ← idea → project setup
session-resume.md ← restore context on session resume
hooks/
block-dangerous.sh ← block dangerous commands
settings.json ← hook wiring
project/ ← auto-generated per project
CLAUDE.md ← project rules
progress.md ← current task state
dev-log.md ← feature-by-feature dev log
docs/ ← store design documents
screenshots/ ← store screenshots
.claude/commands/
workflow.md ← full pipeline orchestrator
plan-and-spec.md ← design + fact-check (Planner)
tdd.md ← implementation (Generator)
ui-ux.md ← UI/UX research
verify.md ← verification (Evaluator)
commit.md ← commit + merge
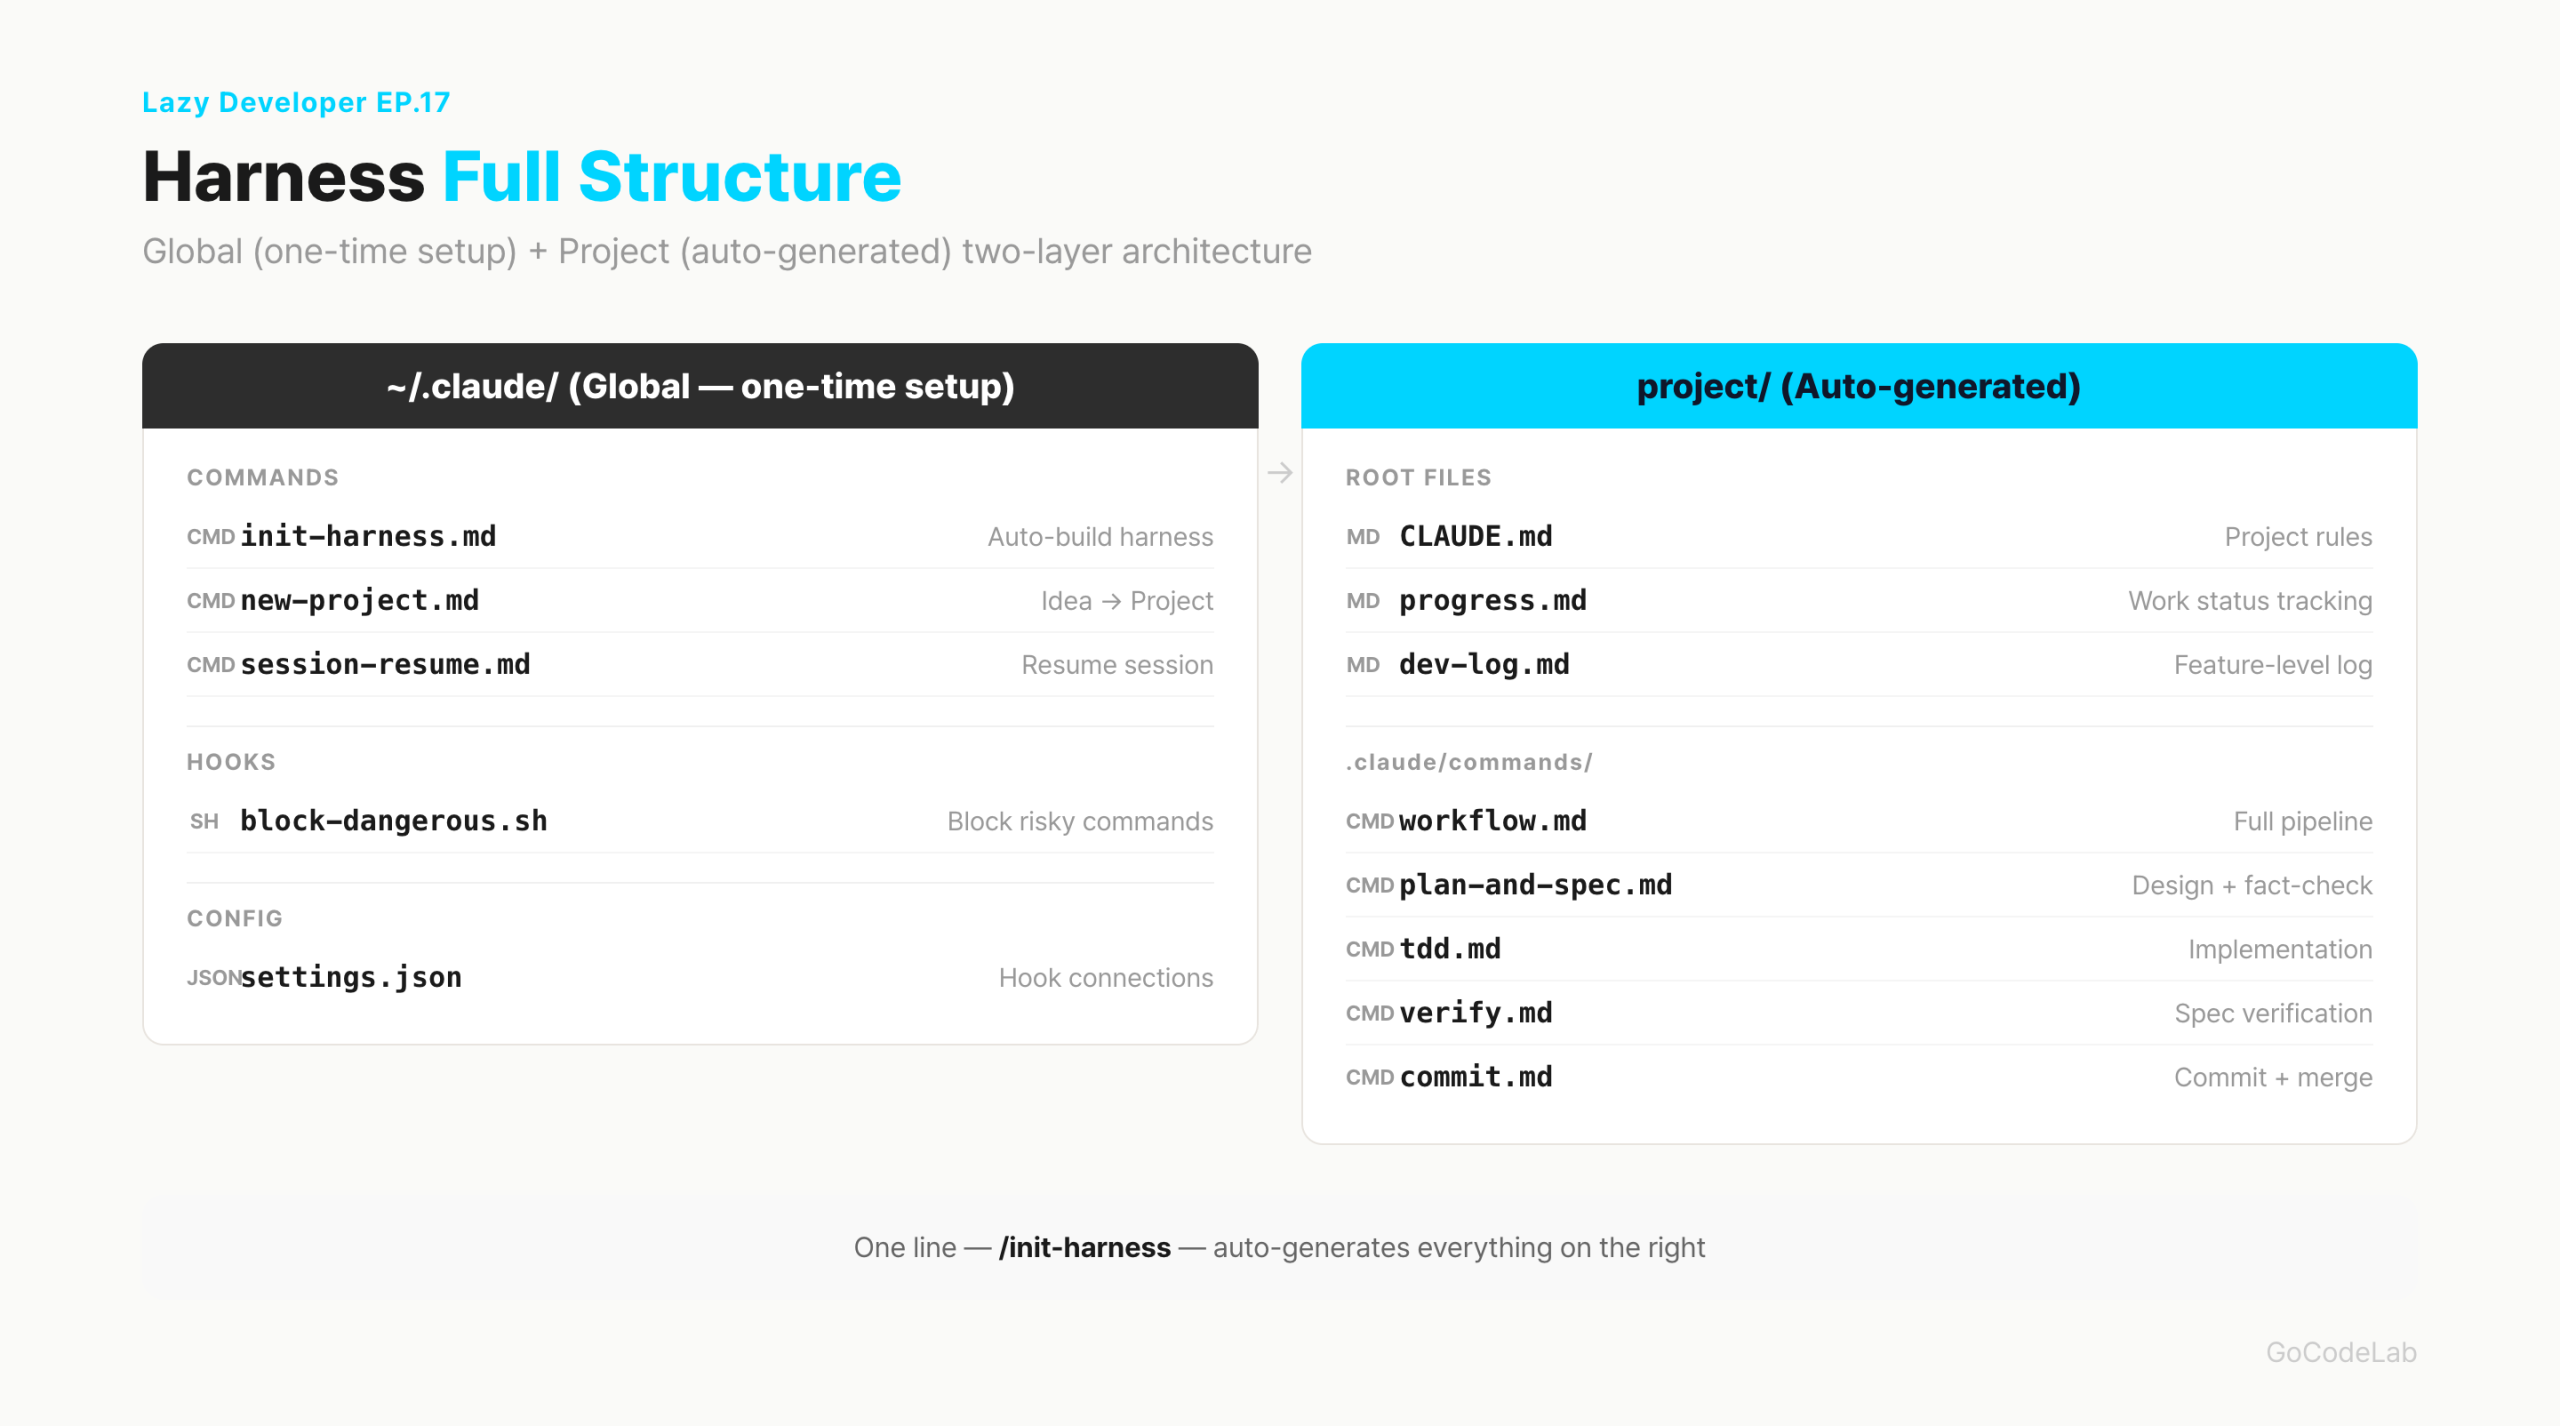
The key is separation. What can be used in any project goes global; what is only meaningful in this project goes inside the project. init-harness automatically creates the entire project area.
init-harness: From Analysis to Generation
Whether starting a new project or attaching a harness to an existing one, you just run /init-harness. It proceeds automatically through five steps. No confirmation prompts in between. It shows one analysis summary, then moves straight to generation.
Step 1 is project analysis. It reads package.json to identify the stack, checks the folder structure 3 levels deep, reads git log for commit patterns, and checks .env.example for integrated services. It only reads. It changes nothing.
git log --oneline -20 # identify commit patterns
git branch -a # check branch strategy
# output format after analysis
[project analysis]
- stack: Next.js 15 / TypeScript / Supabase
- structure: App Router, no src/, feature-based folders
- commit pattern: feat/fix/refactor prefix
- branch strategy: feature/* → direct merge to main
- integrations: Supabase, Resend, LemonSqueezy
- commands to generate: workflow, plan-and-spec, tdd, ui-ux, verify, commit
Step 2 is CLAUDE.md generation. It fills in the tech stack, architecture rules, and absolute prohibitions from the analysis results. It's not a blank template — it's a file built from actually reading the project. Items like "i18n keys only for multilingual text," "no hardcoding," and "no force push to main" are inserted automatically.
Step 3 is command file generation. workflow, plan-and-spec, tdd, ui-ux, verify, and commit are created inside .claude/commands/. Step 4 is generating the project base files: progress.md, dev-log.md, docs/, and screenshots/. Step 5 is checking global files. If session-resume, new-project, or block-dangerous.sh don't exist, it creates them; if they already exist, it leaves them alone.
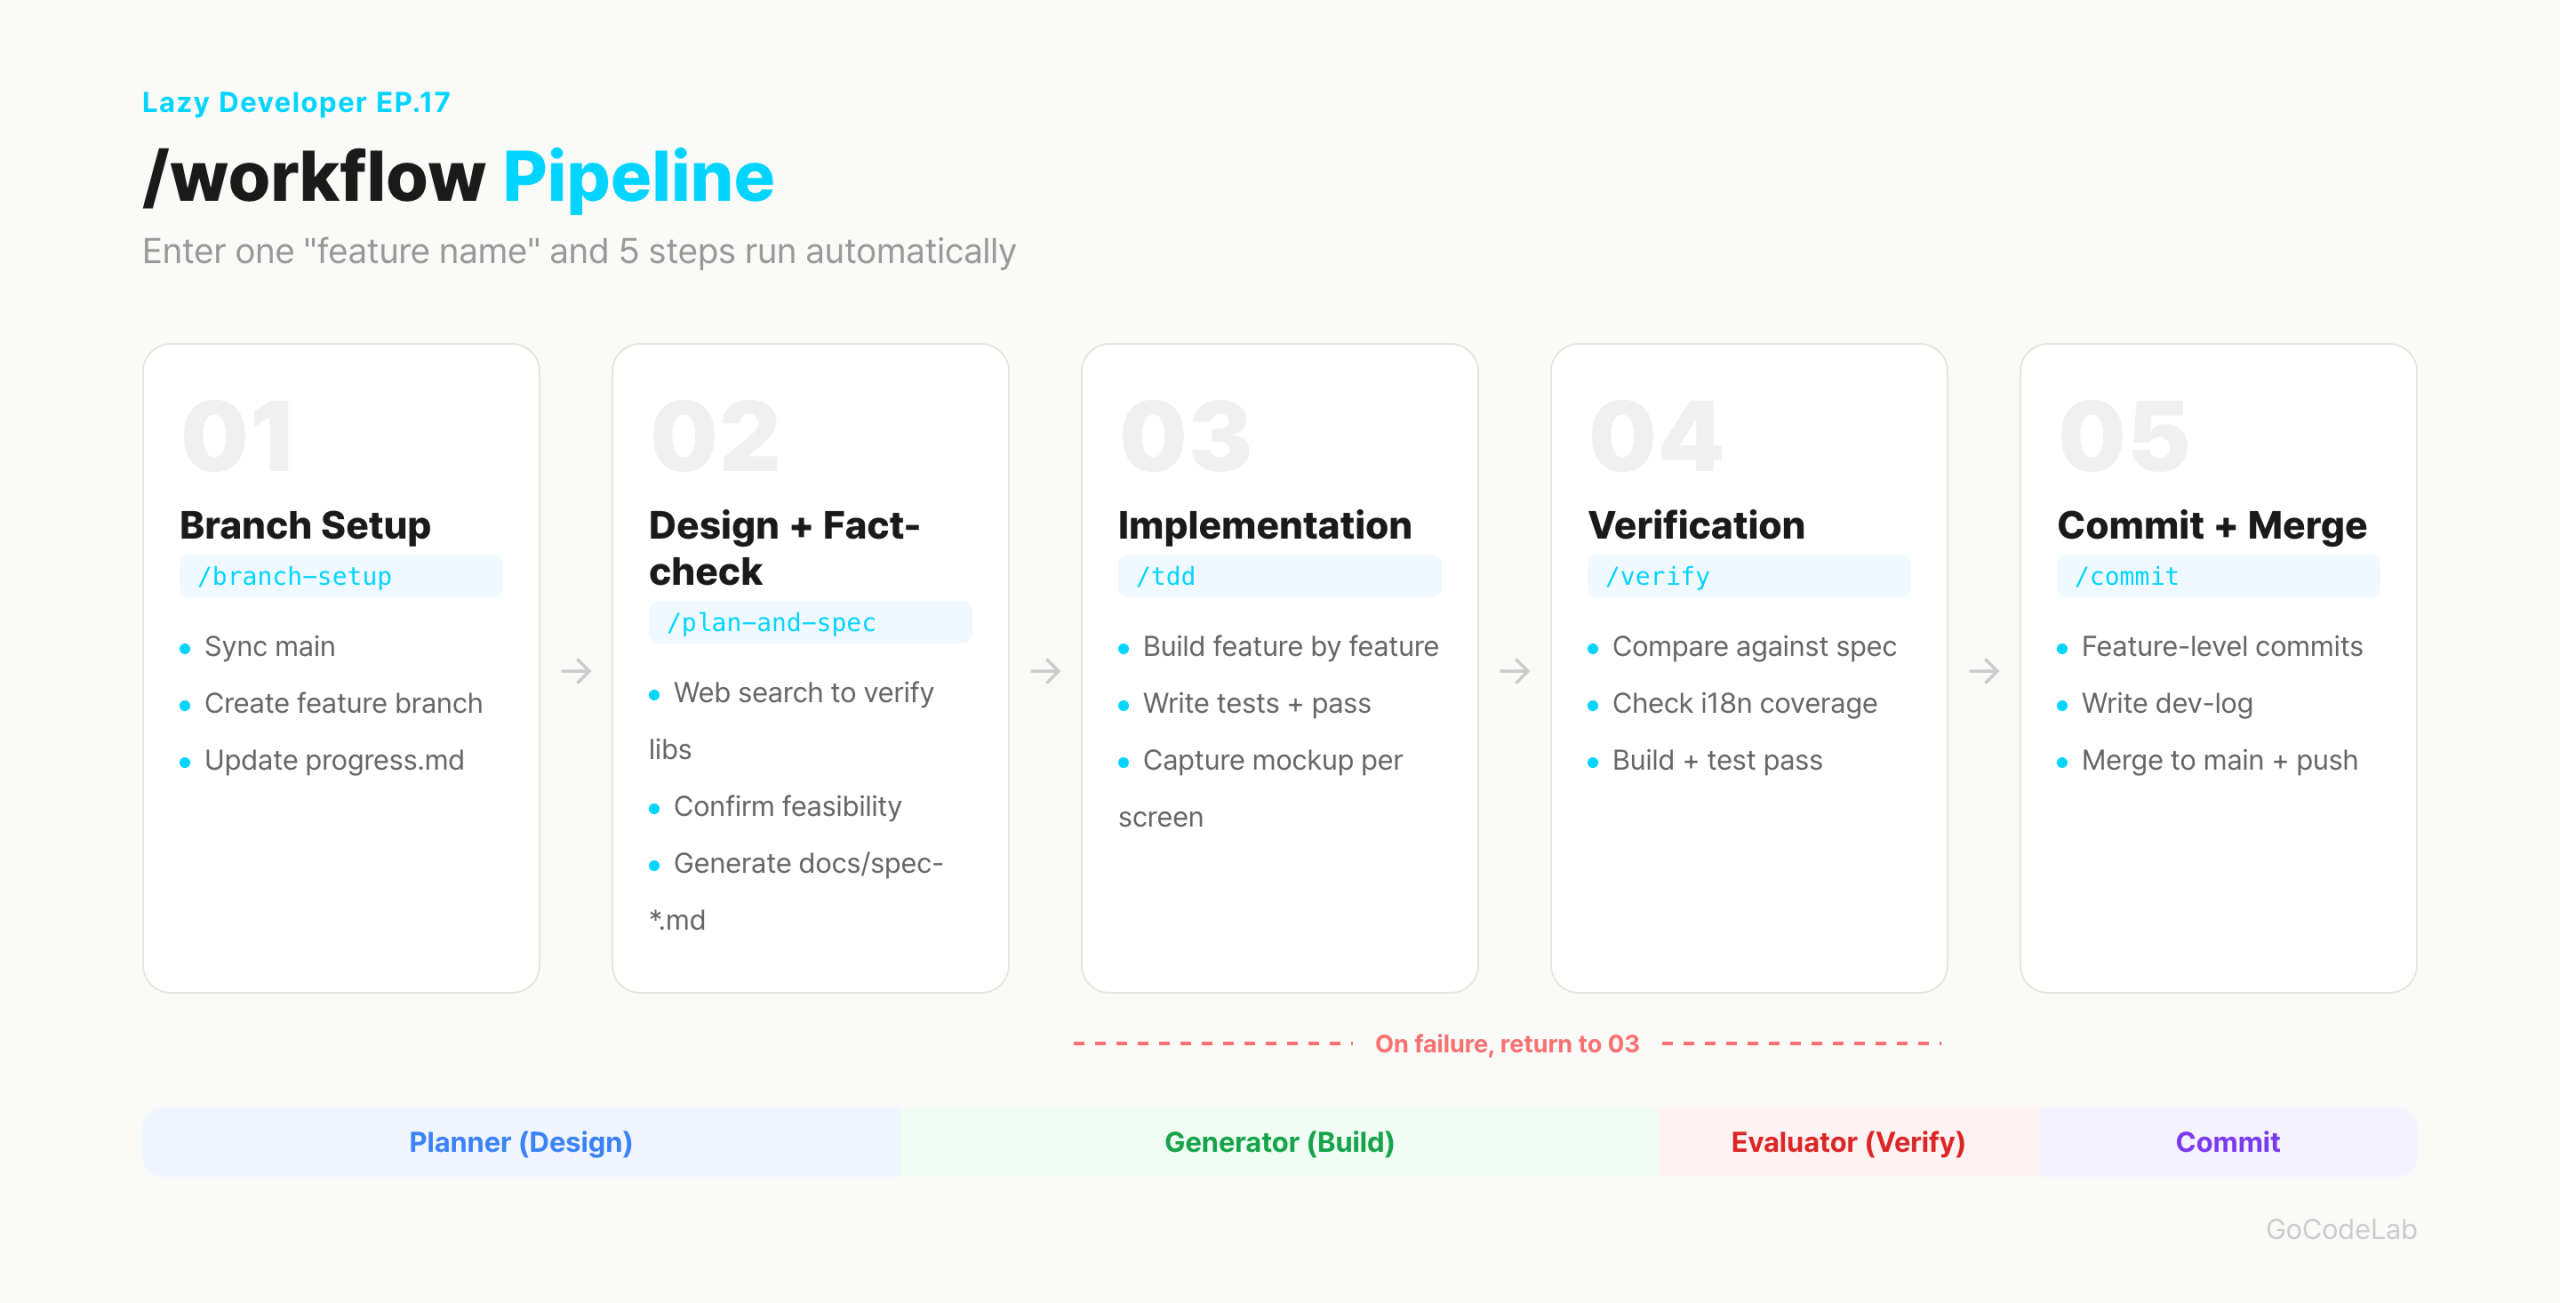
The Command Pipeline
workflow.md is the orchestrator for the entire pipeline. Running /workflow "feature name" calls the rest in order. Each step automatically moves to the next when complete.
0. assess current state # progress.md + git log --oneline -10
1. branch setup # feature/feedback-auto-classify
2. design + fact-check # run /plan-and-spec → Planner
3. implement # run /tdd → Generator
4. verify # run /verify → Evaluator
5. commit + merge # run /commit
# if verification fails → go back to step 3, fix, then re-verify
plan-and-spec forces a web-search fact-check before implementation. It first confirms whether the library actually exists and whether the API can actually be implemented. If anything is 100% impossible, it proposes an alternative. The design document is saved to docs/spec-featurename.md.
tdd breaks things into feature units and implements them one at a time. It includes a step where mock data is injected into each completed screen to make it look real. This bakes in the pattern from EP.08 where I took a screenshot every time I finished a platform-specific widget.
verify is the step that compares the design document against the actual implementation. It checks for missing features, untranslated strings, and build errors. If there are failures, it outputs the fix method alongside them and returns to tdd. It's not just "does it run" — it's "was it built as designed."
Planner → Generator → Evaluator
The core of the command pipeline is the three-role separation. A single Claude switches roles as it works. plan-and-spec takes the Planner role, tdd takes Generator, verify takes Evaluator.
Planner designs and fact-checks before implementation. It first verifies "is this even possible." It web-searches to confirm the library actually exists, checks similar implementation examples, and reviews API constraints — then produces a design document. This step exists to prevent the situation where you start implementing without fact-checking and get stuck.
Generator implements feature by feature while reading the design document. If the design changes during implementation, it immediately updates docs/spec-*.md and states the reason. Keeping design and code in sync is the key. There is no "I'll update it later."
Evaluator compares the design document against the actual implementation. It checks for missing features, untranslated strings, and missing error handling. The Generator does not self-verify. By separating roles, things the implementor is likely to miss get caught by different eyes.
What Actually Happened With the EP.05 Clustering Feature
When building the automatic feedback clustering, the Planner fact-checked the actual parameters for pgvector and the Voyage AI embedding API. The Generator implemented clustering.ts — 188 lines — feature by feature. The Evaluator compared it against the design document and caught a missing cosine similarity threshold handler. Before this, that kind of omission was the type I only caught after shipping.
What Hooks Enforce
Commands are optional, but hooks run automatically. Before Claude executes any bash command, block-dangerous.sh runs first. If it returns exit 2, the command is blocked. It blocks two things.
INPUT=$(cat)
# block direct force push to main
if echo "$INPUT" | grep -q "push.*--force.*main\|push.*main.*--force"; then
echo "main force push blocked" >&2
exit 2
fi
# block .env commit
if echo "$INPUT" | grep -q "git add.*\.env\b"; then
echo ".env file commit blocked" >&2
exit 2
fi
exit 0
This script is wired up as a PreToolUse hook in settings.json. It's automatically called before Claude executes the Bash tool.
{
"hooks": {
"PreToolUse": [{
"matcher": "Bash",
"hooks": [{
"type": "command",
"command": "bash ~/.claude/hooks/block-dangerous.sh"
}]
}]
}
}
The advantage of hooks is that they block mistakes at the source. Even if a force push to main slips in by accident, the system stops it. It's not a human checking — it's the system blocking. Having just these two in place defends against the most catastrophic mistakes.
Full Automation Mode
With the harness set up, running Claude Code with the --dangerously-skip-permissions flag lets it run to completion on its own without asking for confirmation. No "is it okay to do this" in the middle. Run /workflow and everything from branch creation to commit and merge happens automatically.
This mode is not the dangerous part. Using it without hooks is dangerous. The hooks block main force push and .env commits, so the two critical mistakes are automatically defended against. Set up the harness first, then use it — that's the order.
When a session drops and resumes, I use /session-resume. It reads the last 30 lines of progress.md and dev-log.md, plus git log and git status, then summarizes "how far we got and what's next" before picking right back up. It pairs with the CLAUDE.md automation from EP.01. One maintains the rules; the other restores the state.
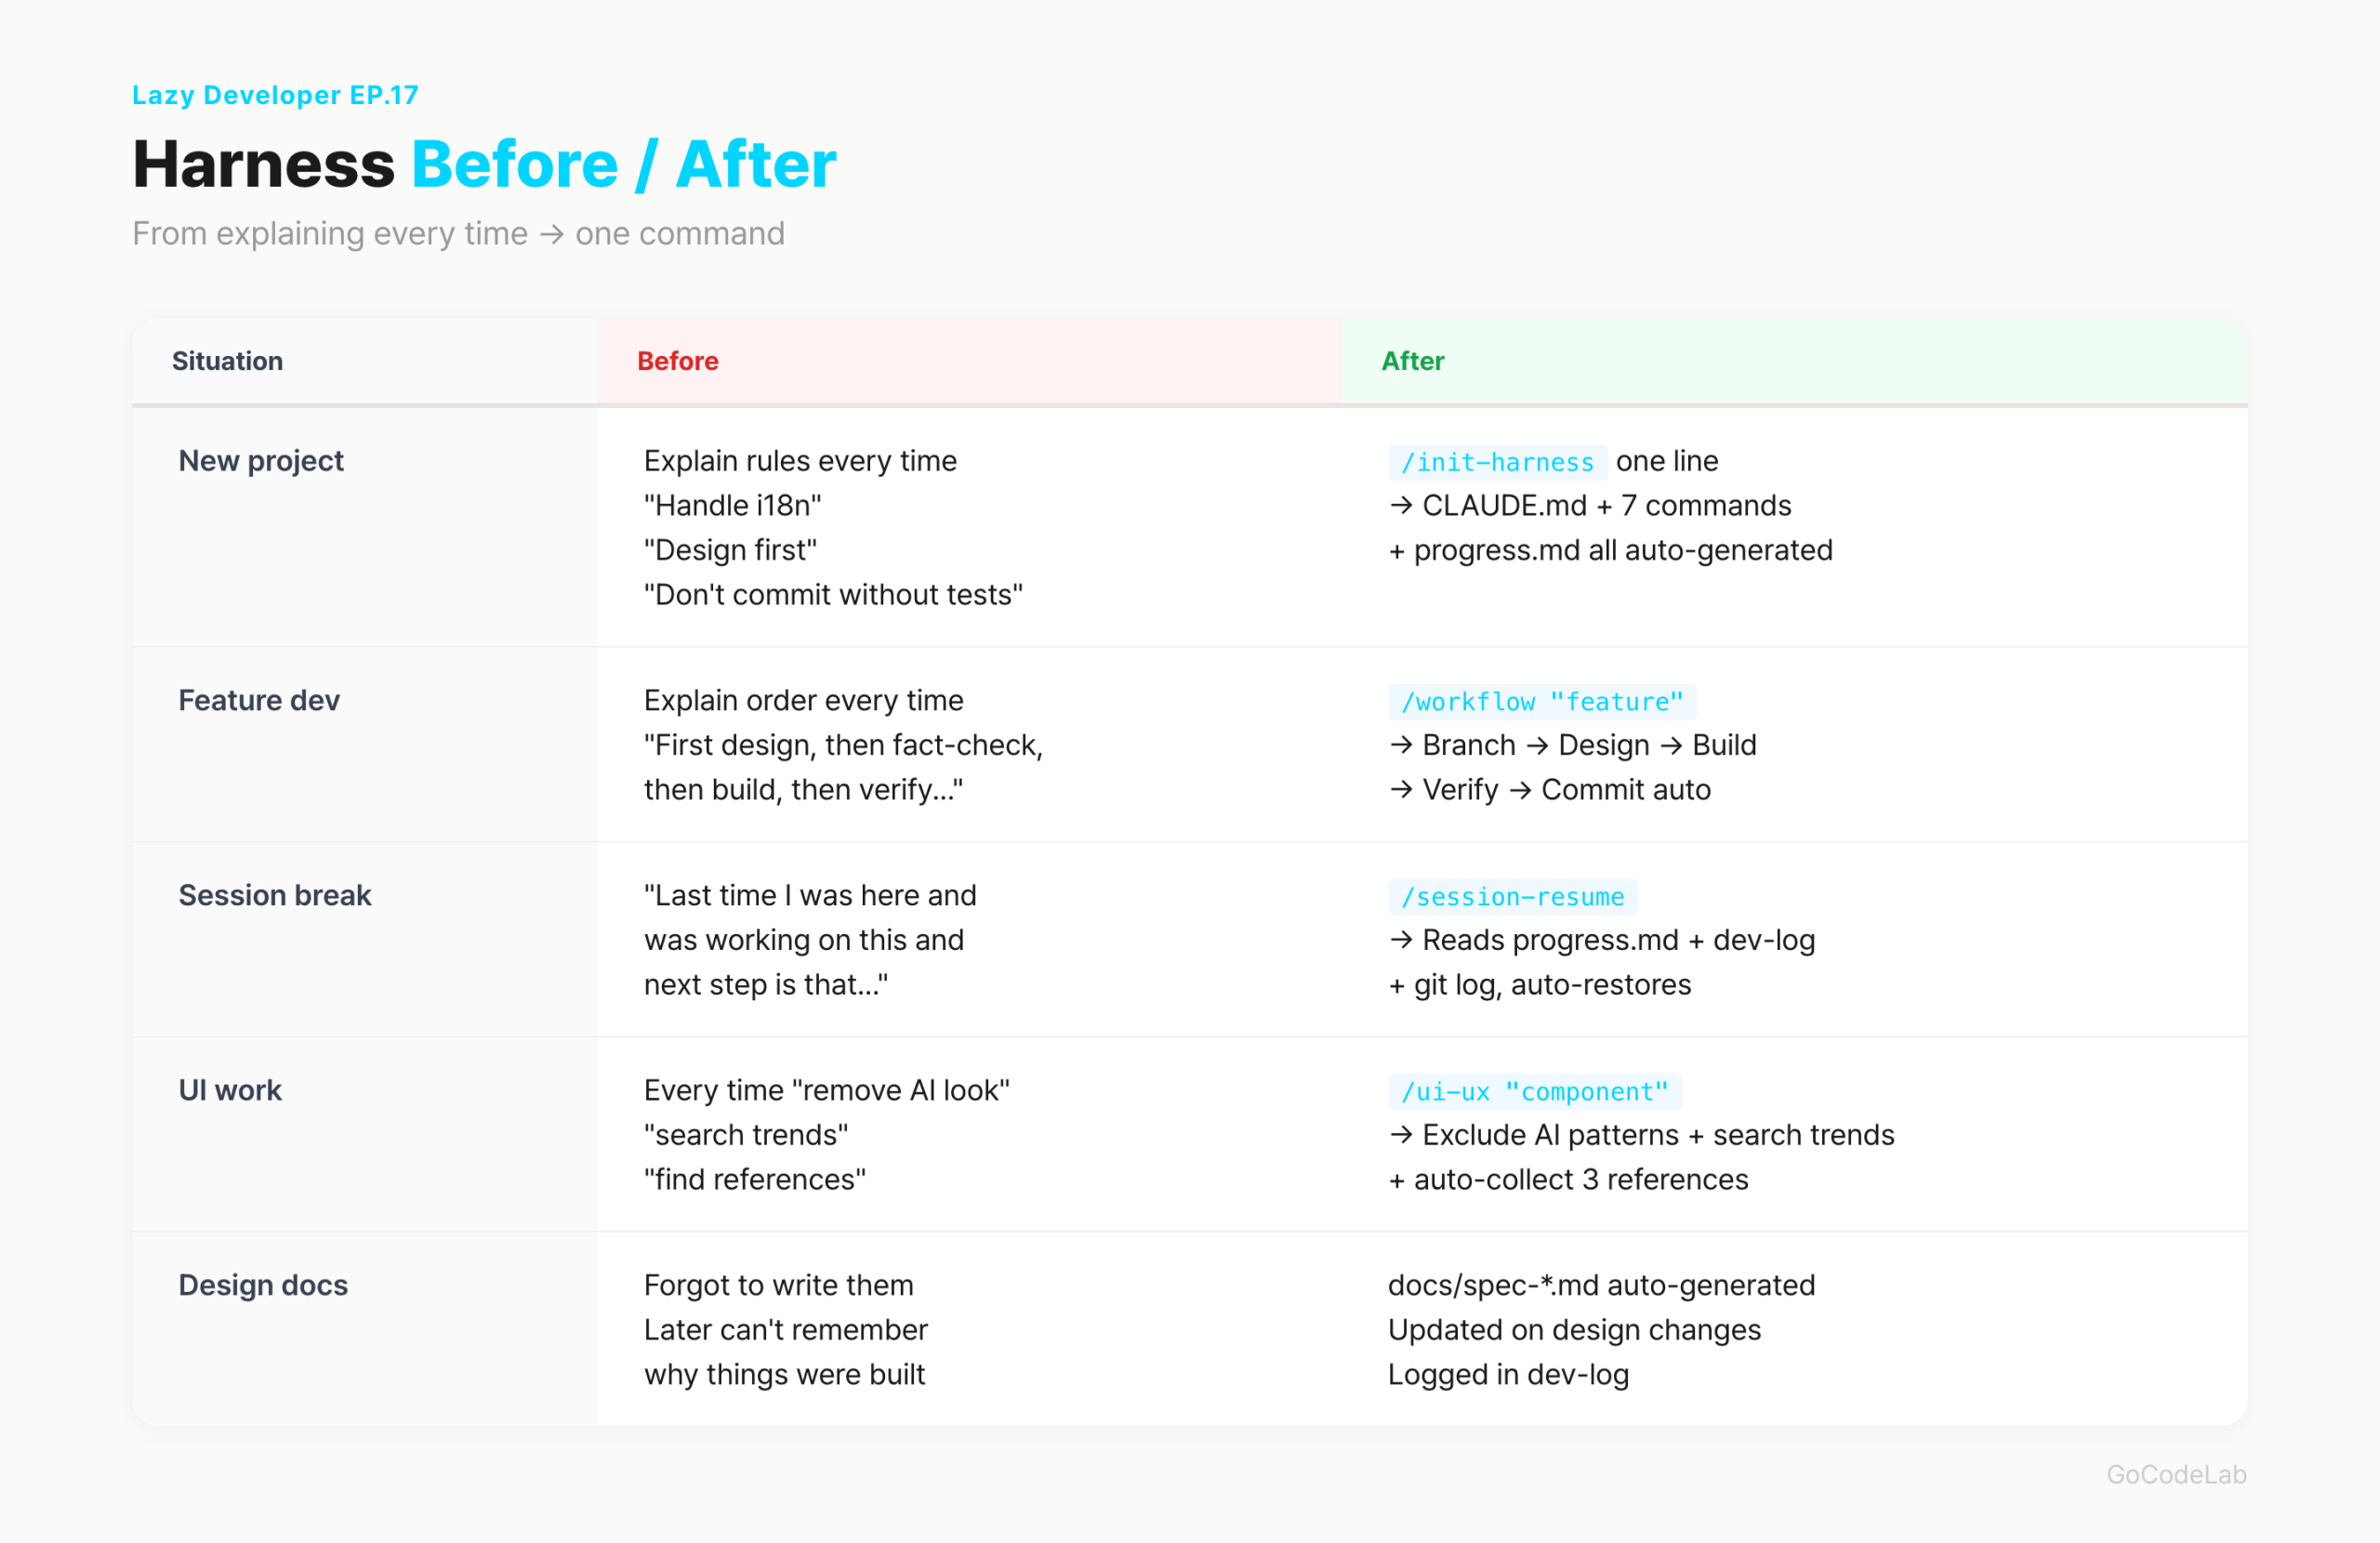
What Changed
A few things changed after building the harness. In numbers, it looks like this.
| Before | After | |
|---|---|---|
| Starting a new project | explaining rules every time (10–15 min) | /init-harness, one line |
| Feature dev order | repeating the order every time | /workflow "feature name" |
| Session resume | re-explaining context | /session-resume |
| UI dev research | requesting separately each time | built into ui-ux.md |
| Design docs | forgotten, not written | auto-generated + auto-updated |
There was an unexpected result. I built this system because I was lazy, but I ended up working more carefully. I started writing design documents. I started doing fact-checks. The steps I used to skip because they were annoying are now baked into the commands — so they just happen.
Frequently Asked Questions
Q. If I run init-harness, do I not need to write CLAUDE.md myself?
It auto-generates one, but it doesn't fully replace writing it yourself. What init-harness creates is a draft based on the project analysis. Team conventions, specific library constraints, and deployment environment details still need to be added manually. Use it as: auto-generate, then fill in the gaps.
Q. Do I have to use commands like /workflow every time?
No. Simple bug fixes or small changes can just be asked in plain language. Commands are only for feature development that needs to go all the way from start to finish properly. Only hooks are always running in the background — everything else is optional.
Q. Isn't the --dangerously-skip-permissions flag dangerous?
It's dangerous without hooks. The hooks block main force push and .env commits, so the order is: set up the harness first, then use it. It's not the flag that's dangerous — using it without hooks is. With just these two in place, full automation mode is usable.
Q. Can this structure be used for team projects?
This structure was designed for solo development. To use it on a team, you'd need to modify the direct-to-main merge section and the branch strategy. Update CLAUDE.md to match team conventions and add a PR creation step to commit.md. The structure itself can be adapted for teams.
Wrapping Up
Setting up this structure took a day or two. Writing command files, making hooks, testing the flow. At first I wasn't sure it was right. Now, every time I start a new project, /init-harness handles everything — so that time wasn't wasted.
The harness is never finished. As you use it, the gaps become visible, and you update the command files each time. It's not about building a perfect framework — it's about cutting out annoying things one by one. That's the Lazy Developer way.
Related Episodes
The code and structure in this post were written as of April 2026. Hook configuration may change with Claude Code updates.
GoCodeLab · Lazy Developer Series · EP.17