Harness Engineering — The Environment Matters More Than the Prompt
Harness engineering is the next step after prompt engineering. CLAUDE.md, Skills, MCP, Hooks — a practical guide to designing the execution environment that changes results with the same model.
목차 (13)
- What Is a Harness
- The Limits of Prompt Engineering
- Three-Stage Evolution: Prompt → Context → Harness
- 5 Core Components
- How to Write CLAUDE.md Properly
- Skill File Design
- Hooks — Mandatory Rules AI Cannot Ignore
- Things to Watch When Connecting MCP
- Practical Application — Difference Seen in Before/After
- Core Principles in Design
- You Don't Have to Be a Developer
- Frequently Asked Questions
- Related
April 2026 · AI News
Writing good prompts alone is not enough. Even with the same model, results vary significantly depending on environment setup. This is called harness engineering.
It started spreading around the time OpenAI announced Codex. The Claude Code source code leak was also a trigger for its spread. The structures discovered in that code were the first to reveal what harness engineering actually looks like.
Not just developers but non-developers are quickly absorbing this concept. The core insight is that designing the structure in which AI works matters more than prompt tricks. I documented the concept and practical application in this article.
- Harness = the entire execution environment wrapping the AI model
- CLAUDE.md, Skills, MCP, Hooks, Sub-agents — the 5 core elements
- OpenAI Codex: 5 months, 1 million lines, 0 lines written directly by humans
- Environment is the bottleneck, not the model. Results can differ 10x with the same model
- CoT prompting effect: 39%p → 3%p (Wei 2022 → Wharton 2025)
Table of Contents
- What Is a Harness
- The Limits of Prompt Engineering
- Three-Stage Evolution: Prompt → Context → Harness
- 5 Core Components
- How to Write CLAUDE.md Properly
- Skill File Design
- Hooks — Mandatory Rules AI Cannot Ignore
- Things to Watch When Connecting MCP
- Practical Application — Difference Seen in Before/After
- Core Principles in Design
- You Don't Have to Be a Developer
What Is a Harness
The word comes from a horse harness. The harness is the entire apparatus that guides the horse called AI in the desired direction. It's the concept of designing not the model itself, but the entire environment in which that model works. It's not about a single prompt line — it's about setting up the entire board.
Context files, skill files, MCP servers, and execution loops are all included. Verification processes and human intervention points are all part of the harness. Humans are part of the harness too. It is not a system where AI runs alone.
It's not about what to ask AI. It's about how to set up the board where AI can work. The core argument is that the environment is the bottleneck, not the model. That's why results can differ 10x with the same model depending on environment setup.
The Limits of Prompt Engineering
Once, the single phrase "think step by step" (Chain-of-Thought) boosted math accuracy by 39%p (Wei et al. 2022, GSM8K benchmark). A 2025 Wharton GAIL study remeasured with the latest models and found it dropped to about 3%p. Evidence that as models advance, the effect of prompt tricks is disappearing.
The more advanced the model, the more built-in reasoning it already has. There is less room for prompt manipulation. No matter how sophisticated a system prompt is, there are fundamental limits. Designing structure yields better long-term returns than spending time hunting for tricks.
A harness, by contrast, can be reused even as models are upgraded. The structure itself is not tied to a specific model. A CLAUDE.md written this year will work the same with next year's models. This is why investing in harness rather than prompts is the right move.
Three-Stage Evolution: Prompt → Context → Harness
There are three stages. Prompt engineering → context engineering → harness engineering. Each maps to "What to ask → What to show → How to design." We are now at the transition into the third stage.
Context engineering is deciding what ingredients to give AI. Harness is designing the entire kitchen that holds those ingredients. Good ingredients alone are not enough. Tool placement and task sequence must be designed together.
There is a case from the medical field that demonstrates this difference. Providing relevant data and restricting scope reduced hallucinations from 40% to 0%. Without changing the model. Changing the context alone changed the results. Harness is a broader concept that includes this context design.
5 Core Components
The 5 core elements of a harness are Agent.md (CLAUDE.md), Skills, MCP, Hooks, and Sub-agents. Each has a different role and they are used in combination. What makes the difference is not which tool you use, but how well you design these 5 structures.
| Element | Role | Analogy | Key Caution |
|---|---|---|---|
| Agent.md | Documenting project rules | New employee onboarding manual | Keep under 300 lines |
| Skills | Separating task-specific expertise | Department-specific reference files | Separate file per task |
| MCP | Connecting external tools | USB hub | Connect only what's needed |
| Hooks | Mandatory execution rules | Automatic checklist | Use instead of prompts |
| Sub-agents | Parallel task processing | Team member division of labor | Verify dependencies first |

This structure can be applied equally in both Claude Code and Cursor. The harness structure works the same regardless of the tool. Whether you have this structure matters more than which AI coding tool you use.
How to Write CLAUDE.md Properly
CLAUDE.md (or Agent.md) is the foundation file of the harness. It documents project structure, coding rules, and standards AI must follow. The general consensus is under 300 lines. HumanLayer stated they keep it under 60 lines in their own projects. An ETH Zurich study found that auto-generated CLAUDE.md by LLMs actually increased token costs by 20% and lowered performance. Writing it yourself is better.
The key is not writing things that Claude can figure out by reading the code. Standard language conventions, per-file descriptions — these are left out. Conversely, things that cannot be known from code alone must be written. Bash commands, branch rules, project-specific architecture decisions.
| What to Write | What to Skip |
|---|---|
| Bash commands Claude cannot infer | Things derivable by reading the code |
| Code style rules that differ from defaults | Standard language conventions (Claude already knows) |
| Test runner / how to run tests | Detailed API docs (just link them) |
| Branch naming, PR rules | Frequently changing information |
| Environment quirks, required env vars | "Write clean code"-style obvious things |
The scope of application varies by file location. ~/.claude/CLAUDE.md applies to all projects. CLAUDE.md at the project root applies only to that project. CLAUDE.local.md is for personal settings and goes in .gitignore. In a monorepo, placing separate CLAUDE.md files in subdirectories applies them hierarchically.
Not everything goes into CLAUDE.md. The Progressive Disclosure pattern of referencing separate documents is key. Here's what it looks like in practice:
- Use ES modules (import/export), not CommonJS (require)
- Destructure imports when possible
# Workflow
- Typecheck when done making code changes
- Run single tests, not the full suite
# References
See @README.md for project overview
Git workflow: @docs/git-instructions.md
Personal overrides: @~/.claude/my-project-instructions.md
- Under 300 lines is the general consensus. Shorter is better. Longer makes AI slower
- Not a manual, but an index. Write only "where to find what"
- Don't write things Claude can figure out by reading the code
- Separate detailed rules into separate documents and reference with
@path - Remove stale documents immediately. AI follows outdated rules
Skill File Design
Skill files are task-specific expertise separated into the .claude/skills/ folder. The difference from CLAUDE.md is "always loaded vs. loaded only when needed." Putting everything in CLAUDE.md wastes the context window. Skills are only loaded when that task is being performed.
The actual directory structure looks like this:
api-conventions/
SKILL.md # main (required)
reference.md # detailed docs (loaded on demand)
examples.md # usage examples
fix-issue/
SKILL.md
deploy/
SKILL.md
Adding name and description in the SKILL.md frontmatter lets you invoke it as a slash command. Setting disable-model-invocation: true means it won't be invoked automatically by AI — it only runs when a human calls it directly. There are two types: reference skills and task skills:
---
name: api-conventions
description: REST API design conventions
---
- Use kebab-case for URL paths
- Use camelCase for JSON properties
- Always include pagination for list endpoints
# Task — Fix GitHub issue (/fix-issue 123)
---
name: fix-issue
description: Fix a GitHub issue
disable-model-invocation: true
---
Analyze and fix: $ARGUMENTS
1. Check issue with `gh issue view`
2. Search code → fix → test → create PR
There is a case of applying this to video production automation. Researcher, script, subtitles, voice, scene design, rendering, QA — split into 7 agent skills. Work that took 9 hours was reduced to 30 minutes.
Hooks — Mandatory Rules AI Cannot Ignore
Hooks are mechanisms that force-execute tasks that AI might ignore even when instructed via prompt. Registered in settings.json, they run automatically when specific events occur. Prompts can be skipped. Hooks cannot. Exit code 0 means allow, 2 means block.
I documented the 5 most commonly used hooks in practice:
{
"hooks": {
// 1. Auto-format after file edit
"PostToolUse": [{
"matcher": "Edit|Write",
"hooks": [{ "type": "command",
"command": "jq -r '.tool_input.file_path' | xargs npx prettier --write" }]
}],
// 2. Block dangerous commands (rm -rf /, git reset --hard)
"PreToolUse": [{
"matcher": "Bash",
"hooks": [{ "type": "command",
"command": ".claude/hooks/pre-bash-firewall.sh" }]
}],
// 3. Auto-verify on task completion
"Stop": [{
"hooks": [{ "type": "prompt",
"prompt": "Check if all tasks are complete. Continue if incomplete." }]
}],
// 4. macOS desktop notification
"Notification": [{
"hooks": [{ "type": "command",
"command": "osascript -e 'display notification \"Claude Code\" with title \"Needs attention\"'" }]
}]
}
}
Hooks that enforce package managers are also useful. In a pnpm project, if AI tries to use npm, it gets blocked:
cmd=$(jq -r '.tool_input.command // ""')
if [ -f pnpm-lock.yaml ] && echo "$cmd" | grep -Eq '\bnpm\b'; then
echo "This repo uses pnpm. Replace npm with pnpm." 1>&2
exit 2 # block
fi
exit 0 # allow
Things to Watch When Connecting MCP
MCP is an adapter that connects AI agents to external tools. Like a USB hub — it attaches external capabilities like Gmail, browser automation, and document search to AI. In practice, it's used to automatically send a report email via Gmail MCP after completing Excel work.
There is a caveat. Connecting more MCPs is not better. It wastes tokens and creates confusion. The principle is to connect only what's needed. If it feels like MCP is being forced into use, removing it is the right call.
- Connect only what's immediately needed
- The more connections, the higher the chance of AI judgment errors
- Disconnect MCPs that are not actually being used
- Excessively connected MCPs waste the context window
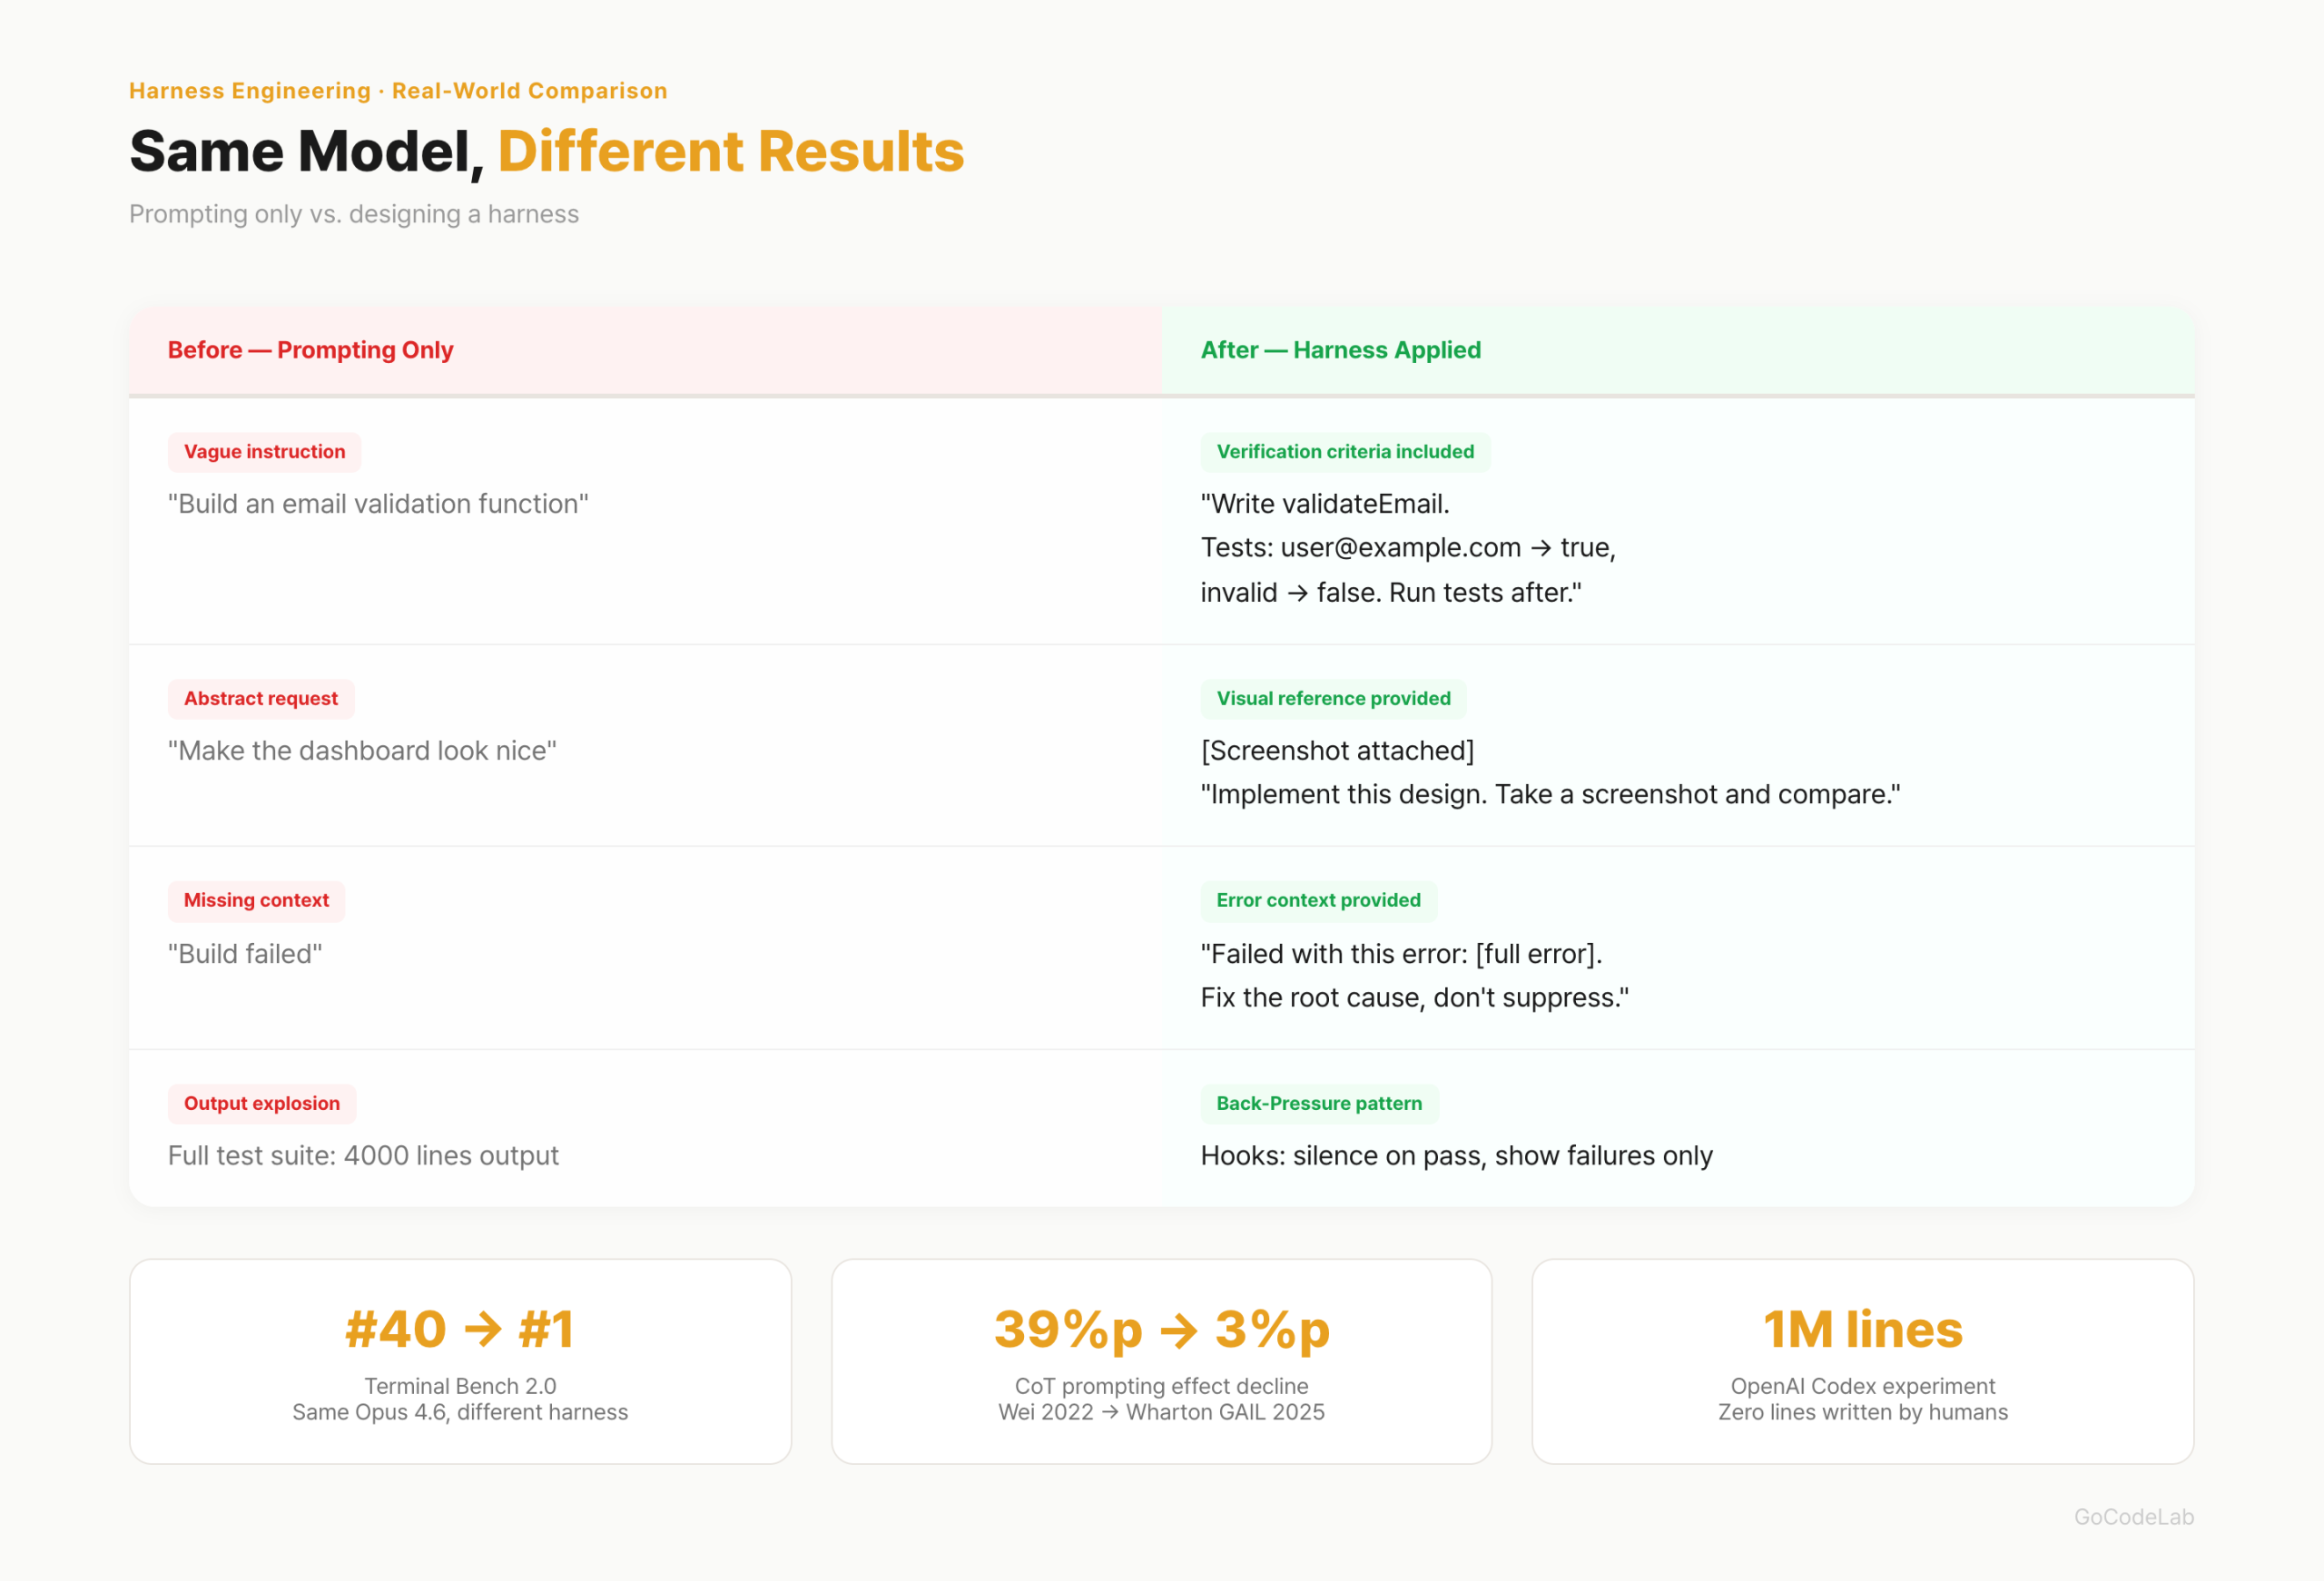
Practical Application — Difference Seen in Before/After
The OpenAI Codex experiment is the representative case. 5 months, 1 million lines of code, 0 lines written directly by humans. 1,500 PRs merged. One engineer completed an average of 3.5 tasks per day. In Terminal Bench 2.0, the same model (Opus 4.6) ranked 40th with the default harness (Claude Code defaults) and 1st with an optimized harness. The harness, not the model, determined the ranking.
Mitchell Hashimoto (HashiCorp founder) summarized the core principle this way. "Every time the agent makes a mistake, engineer it so that mistake can never happen again." Not fixing mistakes, but building a structure that makes mistakes impossible.
I summarized specifically how it differs in a Before/After breakdown:
| Before (Prompts Only) | After (Harness Applied) |
|---|---|
| "Make an email validation function" | "Write validateEmail. Tests: user@example.com → true, invalid → false. Run tests after implementing" |
| "Make the dashboard look nice" | [Screenshot attached] "Implement this design. Take a screenshot of the result and compare with the original" |
| "Build failed" | "Failed with this error: [paste error]. Don't suppress the error — fix the root cause" |
| Full test output of 4,000 lines printed | Hooks silence success, show only failures (Back-Pressure pattern) |
- Kitchen Sink Session — mixing unrelated tasks in one session → reset context with
/clear - Same fix repeated 3 times — learning failure → new prompt reflecting the failure cause after
/clear - CLAUDE.md exceeding 200 lines — context waste → keep only essentials, move the rest to Skills
- Endless exploration — investigation request without scope → split into sub-agents
There is one common thread. The initial setup takes time. Once built, subsequent iterations automatically accelerate. The setup cost is one-time; the effect is cumulative.
Core Principles in Design
Giving only the final goal is not enough. Intermediate stage verification criteria must also be specified. Not "just produce the output" but "must pass this criteria at this stage to proceed to the next." When goals are vague, AI looks for shortcuts.
Semi-automatic structures with explicit approval gates are more realistic than fully automatic. In the video production automation case, approval gates were placed at 4 points: script, voice, scene design, and QA. Not AI running to the end alone, but humans checking in between. At the current level of technology, this is the realistic choice.
Fix code patterns before they go wrong. Lock good rules in with linters and tests. Remove stale rules quickly. If AI follows incorrect past rules, problems accumulate.
- Context file (CLAUDE.md etc.): under 300 lines, short table-of-contents style
- MCP: only what's needed. More connections means more confusion
- Remove stale documents. If AI follows old rules, work goes wrong
- Design human intervention gates explicitly
- Specify verification criteria for each intermediate stage
You Don't Have to Be a Developer
Harness engineering is not a concept exclusive to development. The same structure works for general tasks like Excel automation, video production, and data analysis. Even people unfamiliar with vibe-coding can design a harness. You can start by writing a single CLAUDE.md file first.
The role of developers is changing. From people who write code to people who design environments where agents can work well. The core of AI development has shifted from prompts to harness. If you're just starting out, begin with a single CLAUDE.md.
Frequently Asked Questions
Q. What is the difference between harness engineering and prompt engineering?
If prompt engineering is the craft of refining what and how to ask AI, harness engineering is the craft of designing the entire environment in which AI works. It includes context files, skills, MCP, hooks, execution loops, verification processes, and human intervention points. A prompt is part of the harness. Harness is a bigger concept than prompts.
Q. How long should CLAUDE.md be?
Under 300 lines is recommended. The longer it is, the more context window it consumes, degrading AI performance. Keeping it short like a table of contents, not a long manual, is key. Writing only "where to find what" is enough. Separate detailed rules into skill files.
Q. Is it better to connect more MCPs?
No. Connecting more MCPs leads to token waste and confusion. The principle is to connect only what's needed. The more connections, the higher the cost of AI deciding which tool to use. If it feels like it's being forced, removing it is the right move.
Q. Can non-developers apply harness engineering?
Yes. Harness engineering is not a concept exclusive to development. The same structure works for general tasks like Excel automation, video production, and data analysis. Even people unfamiliar with vibe-coding can design a harness. It's simply a matter of documenting what rules AI should follow to work.
Q. Where should harness design start?
Starting by writing a CLAUDE.md (or Agent.md) file is the fastest approach. Documenting project structure, code rules, and completion criteria in under 300 lines is the first step. MCP or skill files come after. There's no need to have all five elements from the start.
Lazy Developer Series
Automate Everything
From CLAUDE.md to AI agents — a record of automation I built myself.
View Full Series →The figures in this article (OpenAI Codex 1 million lines, Terminal Bench 2.0, Wharton GAIL CoT study, etc.) are cited from public announcements and papers. Some figures require separate verification from the original papers or official blog posts.
Last updated: April 2026. Harness engineering is a rapidly evolving concept. Tools, APIs, and configuration methods can change at any time.